STEM wraps up the core elements of telecoms business planning, enabling rapid and
reliable, same-day development of business cases – without the laborious re-working
of basic calculations, scope for copy errors and slow handover associated with ad
hoc spreadsheet models. However, full inter-operability with the Excel platform
enables immediate sharing of data with non-specialist colleagues.
Run-time models created with distributable STEM (D-STEM) can be packaged and controlled
entirely by a self-contained Excel interface. This synthesis is established with
the help of an add-in toolbar for Excel which ships as an element of a standard
STEM installation.
From Excel to STEM and back again
There are three components to an effective integration between STEM and Excel:
- input data linked from Excel
- running of scenarios from Excel
- dynamic linking of results directly into Excel.
Through a single formula, the assumptions for a single time-series or an entire
element may be linked from a named range of cells in Excel, much as you would create
inter-file links between workbooks. Thus, inputs are pulled from Excel by STEM when
a model is run.
This technique is described in detail in the October 2002 newsletter article, How
does linking to Excel work? Here we focus on the add-in functions in Excel for
running scenarios and accessing the results of the latest model run.
Running a model from Excel and accessing the results
Running a model is an interactive process. First, click the ‘running man’ button
on the add-in toolbar to save any linked inputs in the current workbook, and then
run the relevant STEM model. Any links to Excel in the model are automatically updated
when the model is run from Excel.
Alternatively, you can associate this functionality with your own Excel control
buttons with reference to the StemRunWorkingModel macro function which is implemented
in the STEM add-in. The second ‘running man’ button runs a selection of the scenarios
in the model, while the third runs all the scenarios.
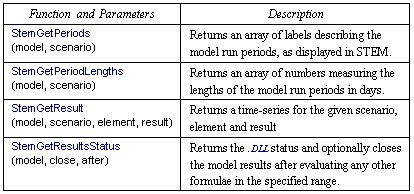
Once a model run is complete, any STEM results linked back to Excel are automatically
updated. For the sake of auditability, such results are linked with a worksheet
function, StemGetResult, which is also implemented in the STEM add-in and which
makes the source model, scenario, element and result explicit for each time-series
result which is dynamically linked from STEM.
Note: since this function returns results as a time-series, it must be entered as
a so-called array function by pressing <CTRL+SHIFT+ENTER>rather than just
<ENTER>in Excel.
Understanding how it all fits together
The add-in is installed into Excel by selecting Add-Ins… from the Tools menu in
Excel. Click the Browse button to locate the STEM.XLA file in the STEM installation
folder, and then click OK. A copy of the STEM add-in toolbar now appears.
In order to experiment with the functionality described above, click the first button
on the add-in toolbar (‘Edit Toolbar Definitions’), and accept the prompt to paste
toolbar definitions into a new sheet, generally known as the ‘control sheet’.
The STEM Installation and Model paths above tell the add-in where to find STEM,
and which model to run with the StemRunWorkingModel function described above (as
well as the associated functions to run scenarios). In addition, the combined full
path of the model name is labelled as a named range, StemModel, which is typically
used as the first parameter for calls to StemGetResult. The add-in ‘touches’ this
range after running the model in order to force Excel to re-calculate all dependent
StemGetResult formulae.
Note: results from additional models may be updated at this time by adding the relevant
full paths immediately below StemModel and defining this extended range of model
names as StemUpdate.
You can click the second button on the add-in toolbar (‘Paste Sample Formulae’),
and again accept the prompt to paste sample formulae into a new sheet. This inserts
a sheet with a predefined set of example results linked from the LOCALOOP demonstration
model which can be readily adapted to your own models. We plan to extend this command
to offer a range of predefined results templates, such as profit and loss and balance
sheet, to expedite the creation of standard reports in Excel, including user-defined
templates with your own preferred formatting.
The meaning of the other toolbar definitions and the function of the remaining toolbar
buttons are described in section 5.5 of the User Guide, Exporting results to Microsoft
Excel spreadsheets.
Portability
There are a couple of issues which must be considered when distributing an Excel
interface for a STEM model to other colleagues or clients.
First, the end-user may need to update the control sheet to identify a different
STEM installation folder on their system. With a run-time model package, it may
suffice to include an autoload macro which identifies the same folder location for
the distributable run-time software components as for the control workbook itself.
(We may add a registry setting to automate this fix-up in future.)
The same issue applies to the model folder, which in many cases will be the same
as the workbook folder, and works best with a similar autoload strategy.
A more subtle issue, and a common cause of confusion, relates to the worksheet functions
implemented by the add-in, such as StemGetResult. Although Excel suppresses this
detail when the add-in is loaded, all references to these functions include the
full path of the add-in file, STEM.XLA. (You can review the original location by
selecting Links from the Edit menu in Excel.)
Although a similar fix-up is all that is required on another user’s computer, what
confuses the issue is that, once you have loaded the add-in toolbar from one location,
Excel remembers where it came from, even if you use the Excel add-in manager to
load a new copy of the add-in from a different location. Clicking the toolbar prompts
Excel to attempt to load the add-in from its original location, leading to a message
which says that Excel cannot open two copies of the same add-in document at the
same time. (This is a general limitation of Excel.)
The most reliable way out of this situation is to delete the toolbar, and then load
a fresh copy from the desired add-in file:
- Select Add-Ins… from the Tools menu in Excel. The Add-Ins dialog is displayed.
- Locate and de-select the entry for the STEM Add-In, and then click OK.
(Notice that the STEM add-in toolbar persists.)
- Now right click the STEM add-in toolbar and select Customise…
- Find ‘STEM Add-In’ in the list of toolbars and then click Delete. (Now
the toolbar should disappear.)
- Return to the Tools menu and Select Add-Ins… again.
- Click the Browse button in the Add-Ins dialog and locate the folder with your latest
STEM installation.
- Select STEM.XLA and click OK.
- Excel warns, “A file named ‘stem.xla’ already exists in this location. Do you want
to replace it?” This message relates only to a link file which remembers the location
of the original add-in, and should indeed be replaced with the reference to the
new location.
- Click OK to close the Add-Ins dialog. A new copy of the toolbar appears, which is
now linked to the new add-in location.
Again, we are exploring ways to automate the add-in selection process to avoid these
obscure but very disconcerting problems.