STEM supports a flexible format for reading data from Excel. All required inputs
for a given element can be linked through a reference to a single named range in
Excel. The modeller has complete flexibility over which inputs to reference, and
in which order, thus keeping the data in Excel as compact as possible.
This efficiency comes at a price: each time series in the named range must be labelled
to identify the relevant input field in STEM, which requires a technical knowledge
of the relevant labels. Now we are adding a mechanism to automate the population
of such Excel ranges inputs which will make the process of exporting links a breeze.
Linking element data from Excel is elegant but time-consuming
Through a single formula, the assumptions for a single time-series or an entire
element may be linked from a named range of cells in Excel, much as you would create
inter-file links between workbooks. Thus, inputs are pulled from Excel by STEM when
a model is run.

The left-hand column identifies the individual data, while the right-hand column
defines the relevant values. Time series data are read to the right until a blank
cell is encountered. (This technique is described in detail in the October 2002
newsletter article, How does linking to Excel work?) The same principle
works for every type of element, and the full set of labels is provided in an appendix
to the STEM User Guide, as well as in an example workbook, MODEL.XLS, which is supplied
with STEM, and linked directly from the Start menu group for STEM.
However, the process of copying these labels from MODEL.XLS is time-consuming, so
now we are automating the export of data from STEM and necessary formatting for
Excel.
Automating the export of data from STEM and formatting for Excel
Consider a very simple model with two elements as follows:
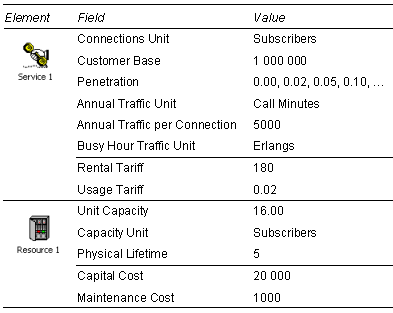
A new command has been added to the File menu in the STEM Editor, provisionally
called Export and Link Selection to Excel. In order to re-structure the
model so that all of the above data can be entered via Excel, two separate changes
are required:
- the data must be exported to Excel and formatted with the appropriate STEM labels
- the data in STEM must be replaced by a single formula for each element linking the
newly exported data from Excel.
Exporting the data to Excel
A key feature of linking element data from Excel is that only the fields of interest
need be included. So STEM only exports the data which have been explicitly entered
(set) by the user (or defined in Excel through a previous link). These data are
exported for each of the selected elements, with the option to export all elements,
or global data too.
STEM creates an Excel workbook in the same folder, and with the same core filename,
as the STEM model, and creates a worksheet within that workbook called ‘STEM export.’
For linking purposes, the data could be written into this sheet as shown below,
with named ranges created for each two-column block as Service 1
and Resource 1 respectively:
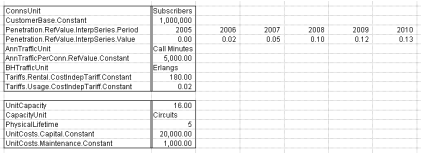
STEM export sheet of new workbook – basic format
However, this lacks the grouping provided in the Editor, and so we have adopted
a more generous design for the sake of clarity which matches the layout of the floating
notes for elements in the STEM Editor. (We may make this extra text optional for
Excel.)
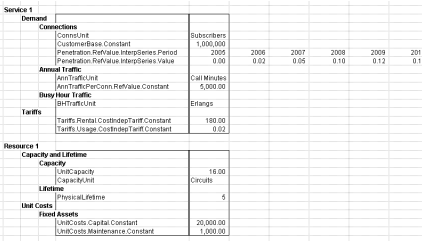
STEM export sheet of new workbook – extended format
There are a few exceptional conditions:
- If the model has not been saved yet, STEM first prompts you to do so.
- If the named workbook already exists, then a new sheet within that workbook is created
and named ‘STEM export n’, where n is the first available positive integer.
- If the workbook is already open in Excel or locked by another user, then STEM will
not be able to create the new sheet and the process aborts.
Linking the Excel data into STEM
The export process is non-destructive; whereas the STEM model must be altered to
replace the explicit data with a link to Excel. Therefore, the Editor prompts before
proceeding, giving you the chance to review the exported data first, or perhaps
use the export just to create a snapshot of the current model data (‘printing to
Excel’) without creating a link.
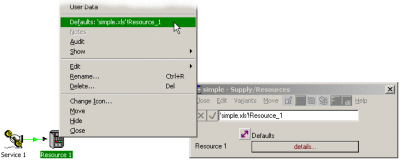
For the link to be created, the element data is first completely unset, and then
re-defined through a formula for its defaults referring to the respective named
ranges in Excel:
Note: the first character of an Excel name must be a letter or an underscore character.
Remaining characters in the name can be letters, numbers, periods, and underscore
characters. Therefore any other characters in a STEM element name will be changed
to an underscore. Also, an Excel name cannot resemble a cell reference, such as
Z$100 or R1C1. So if a STEM element name fits this pattern, a leading underscore
will be added to the corresponding Excel name.
Similar restrictions apply to the Create Name function in Excel, which (at its simplest)
creates named ranges according to the text in the top or left-hand cells of a selection.
It might be preferable to label the STEM export command as Create Excel Names… for
consistency with this functionality.
Exporting additional fields
If you subsequently use drag-and-drop to create a requirement for Resource 1,
then this relationship will be captured only in STEM (and superimposed on the linked
data from Excel). The same applies to any additional data you enter in STEM, either
on top of the data from Excel or on additional fields. In order to add this data
to the Excel interface, just repeat the export command as described above.
As in the case where the workbook already exists, a new worksheet will be added,
and now named ‘STEM export n + 1’. All the new data, together with what was previously
linked from Excel, will be exported. The named range will be re-defined to point
at the data in the new sheet, so that the existing link in the STEM model will capture
the new data. The previous data will be renamed as <name>_n, where n is the
first available positive integer (allowing you to quickly locate the previous version).
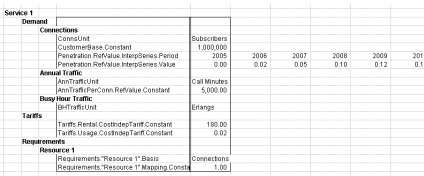
New STEM export sheet added to existing workbook
We will demonstrate the new Excel link generator at the STEM User Group Meeting
in September, and look forward to your suggestions for the final implementation.